
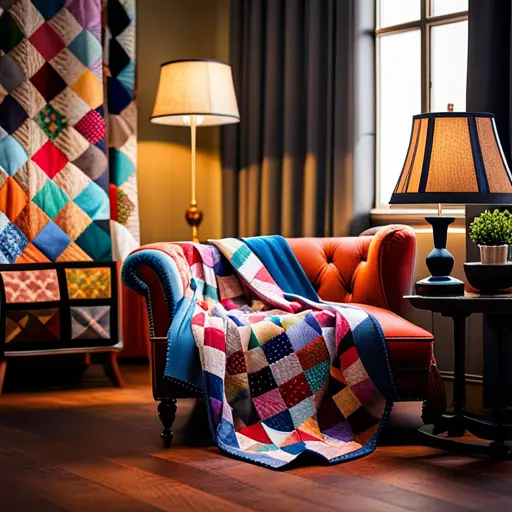
So, you’ve decided to embark on the timeless art of crafting a handmade quilt for your home decor. While it may seem like a throwback to simpler times, a well-crafted quilt can add a touch of warmth and charm to any space.
But where do you begin? Well, fear not, for we are here to guide you through the process step by step. From selecting the perfect quilt design to adding the finishing touches, we will explore the world of quilting and help you create a masterpiece that will leave your guests in awe.
So, grab your thimble and thread, because this journey is just beginning.
Selecting the Perfect Quilt Design
When selecting the perfect quilt design, it’s important to consider your personal style and the overall aesthetic of your home. Your quilt shouldn’t only be functional but also add beauty and character to your living space.
Start by evaluating your personal style. Do you prefer a more traditional or contemporary look? This will help guide you in choosing the right quilt design.
If you have a modern home with clean lines and minimalistic decor, you may opt for a quilt with bold geometric patterns or a sleek, monochromatic design. On the other hand, if your home has a cozy, rustic feel, you might lean towards a quilt with traditional patchwork or floral motifs.
Consider the color scheme of your home as well. You want your quilt to complement the existing colors in your space. If your decor is mostly neutral, you can choose a quilt with vibrant colors to create a focal point in the room. Alternatively, if your home already has a lot of color, a quilt with more muted tones might be a better fit.
Keep in mind that the quilt design should reflect your personal taste and bring joy to your everyday life.
Choosing the Right Fabrics and Colors
Consider your personal style and the overall aesthetic of your home when choosing the right fabrics and colors for your handmade quilt. The fabric you choose will greatly affect the look and feel of your quilt, so it’s important to select materials that align with your desired style.
If you prefer a more traditional and cozy feel, opt for fabrics like cotton or flannel in warm, earthy tones. These fabrics are soft and breathable, perfect for snuggling up with on a chilly evening.
If you lean towards a modern and sleek aesthetic, consider using fabrics like silk or linen in bold, vibrant colors. These fabrics will give your quilt a luxurious and contemporary look.
In addition to considering your personal style, it’s also important to think about the overall aesthetic of your home. Take into account the existing color palette and decor in your space.
If your home features neutral tones and minimalist design, choose fabrics in muted or monochromatic colors to complement the existing decor.
On the other hand, if your home is filled with bright and eclectic furnishings, don’t be afraid to go bold with your quilt fabrics. Opt for vibrant patterns and contrasting colors to make a statement and add visual interest to your space.
Gathering Essential Quilting Tools and Supplies
To gather the essential tools and supplies for quilting, you’ll need to make a list of items necessary for your project. Having the right tools and supplies will make your quilting process more efficient and enjoyable.
First and foremost, you’ll need a good pair of fabric scissors for cutting your fabric pieces accurately. Look for scissors with a sharp and precise blade.
Additionally, a rotary cutter and cutting mat are essential for cutting fabric strips and squares with precision. These tools provide a faster and more accurate alternative to using scissors.
When it comes to sewing, a reliable sewing machine is a must-have. Look for one with adjustable speed settings and different stitch options to suit your quilting needs.
Don’t forget to stock up on quilting needles and thread in various colors to match your fabric choices.
A quilting ruler and a measuring tape will help you measure and cut fabric accurately.
Lastly, invest in a sturdy and spacious storage container to keep all your tools and supplies organized.
With these essential tools and supplies, you’ll be well-equipped to create a beautiful handmade quilt for your home decor.
Cutting and Piecing the Quilt Blocks
Start by selecting the fabric for your quilt blocks and cutting them into the desired shapes and sizes. When choosing fabric, consider the color scheme and design of your overall quilt. Opt for high-quality cotton fabric that’s easy to work with and will hold up well over time. Once you have your fabric, measure and mark the desired dimensions for your quilt blocks. Use a rotary cutter and a cutting mat to ensure precise and clean cuts. Remember to leave a seam allowance around each block to allow for sewing.
After cutting the fabric, it’s time to piece the quilt blocks together. Lay out your cut pieces on a flat surface to visualize the placement and design of your quilt. Play around with different arrangements until you find a pattern that you like. Once you’re satisfied with the layout, start sewing the pieces together using a ¼-inch seam allowance. Press the seams open or to one side to reduce bulk and create a flat surface.
As you piece the blocks together, be mindful of matching seams and corners to ensure a neat and professional finish. Take your time and sew accurately to maintain the integrity of the quilt blocks. Once all the blocks are pieced together, give them a final press to remove any wrinkles or creases. Now you’re ready to move on to the next step of quilting your handmade masterpiece.
Assembling the Quilt Top
To assemble the quilt top, arrange the pieced blocks in the desired pattern and sew them together using a ¼-inch seam allowance. Lay out the blocks on a large flat surface, such as a table or the floor, so you can easily see the design taking shape. Take your time to experiment with different arrangements until you find one that you love.
Once you have settled on a layout, start sewing the blocks together. Begin by sewing the blocks in each row together, one by one. Place the right sides of the blocks together and align the edges. Pin them in place to ensure they stay aligned as you sew. Use a ¼-inch seam allowance and a straight stitch to sew the blocks together. Press the seams open or to one side, depending on your preference and the thickness of the fabrics.
Repeat this process for each row until all the blocks are sewn together. Finally, sew the rows together to complete the quilt top. Take care to match the seams as you sew and use pins to secure them in place. Press the seams open or to one side as before.
Once the quilt top is assembled, it’s ready for the next step in the quilting process.
Quilting Techniques for the Quilt Sandwich
Consider different quilting techniques to secure the layers of the quilt sandwich together and add decorative elements to your handmade quilt. Quilting not only provides structural stability to your quilt but also enhances its visual appeal.
One popular quilting technique is called stitch-in-the-ditch, where you stitch along the seams of the quilt top. This technique creates a clean and subtle look, as the stitches blend seamlessly with the fabric.
Another technique is called free-motion quilting, where you can unleash your creativity and create intricate designs by moving the fabric freely under the needle of your sewing machine. This technique allows you to personalize your quilt with beautiful patterns, such as flowers, swirls, or feathers.
If you prefer a more traditional look, you can try hand quilting. Hand quilting involves using a needle and thread to stitch through all layers of the quilt. This method offers a unique charm and a vintage feel to your quilt.
Finally, you can explore the option of using quilting stencils to guide your quilting designs. These stencils come in a variety of shapes and sizes, allowing you to create precise and consistent patterns on your quilt.
Adding Binding and Finishing Touches
After completing the quilting process, it’s time to add the binding and add those final finishing touches to your handmade quilt.
Adding binding not only gives your quilt a polished look but also helps to secure the edges and keep everything in place.
To start, cut strips of fabric that are about 2.5 inches wide and long enough to go around the entire perimeter of your quilt.
Fold the strips in half lengthwise and press them with an iron to create a neat crease.
Next, align the raw edges of the binding with the raw edges of your quilt and pin them together.
Sew along the raw edges, leaving a small opening to turn the binding right side out.
Once you’ve turned the binding, use a blind stitch or a decorative stitch to close the opening and secure the binding to the quilt.
Finally, give your quilt a thorough pressing to make sure everything is crisp and smooth.
Trim any loose threads and voila! Your handmade quilt is ready to be displayed and enjoyed in your home.
Displaying and Caring for Your Handmade Quilt
One important aspect to remember when displaying and caring for your handmade quilt is how to properly hang or store it.
Hanging your quilt on a wall can be a great way to showcase its beauty and craftsmanship. To do this, use a quilt hanging sleeve, which is a fabric tube sewn onto the back of the quilt. Insert a wooden dowel or curtain rod through the sleeve and hang it securely on the wall. Make sure to avoid direct sunlight, as it can cause fading and damage to the fabric over time.
If you prefer to store your quilt, it’s important to keep it in a cool, dry place to prevent any moisture or mildew from forming. Fold the quilt carefully, avoiding sharp creases, and place it in a clean cotton or acid-free storage bag. Avoid storing it in plastic bags, as they can trap moisture and lead to mold growth.
Lastly, it’s a good idea to periodically check on your quilt to ensure there are no signs of damage or pests. By properly hanging or storing your handmade quilt, you can ensure its longevity and enjoy it for years to come.