
So, you want to add some pleats and tucks to your sewing projects for that extra texture and detail, huh? Well, you’ve come to the right place.
In this discussion, we’ll explore the art of creating pleats and tucks, from the basic techniques to more intricate variations.
But be warned, once you start experimenting with these techniques, there’s no turning back – your creations will never be the same again.
So, let’s dive in and unlock the secrets of pleats and tucks that will elevate your sewing game to a whole new level.
What Are Pleats and Tucks?
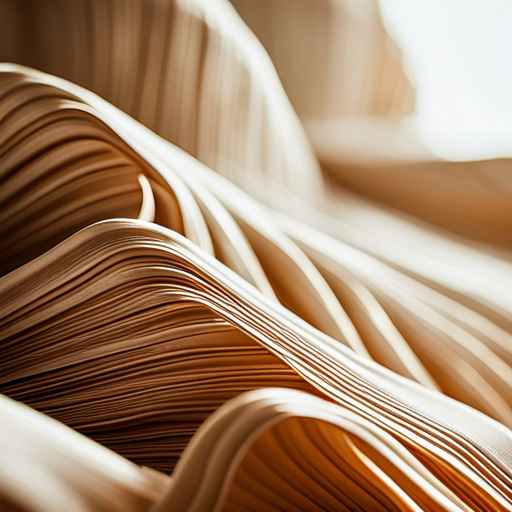
Pleats and tucks are fabric manipulation techniques that add texture and detail to garments. They’re commonly used in sewing and fashion design to create interesting and visually appealing effects. Pleats are folds of fabric that are pressed and stitched in place, while tucks are small, controlled folds that are stitched down. Both techniques involve folding the fabric and securing it with stitches, but they differ in the way the folds are created.
Pleats can be created in various ways, such as by folding the fabric back and forth in a regular or irregular pattern. They can be narrow or wide, depending on the desired effect. Pleats can also be pressed in one direction or pressed in opposite directions to create more volume.
Tucks, on the other hand, are usually narrower than pleats and are often used to create a more tailored look. They can be placed close together or spaced out to achieve different effects.
When used strategically, pleats and tucks can add depth, dimension, and visual interest to garments. They can be used to create shape, add volume, or highlight specific areas. Pleats and tucks can be found on various types of clothing, including dresses, skirts, pants, and even sleeves. They’re versatile techniques that can be adapted to suit different styles and designs.
Tools and Materials Needed
To successfully create pleats and tucks, you’ll need a few essential tools and materials.
Firstly, you’ll need a sewing machine. While it’s possible to create pleats and tucks by hand, a machine will ensure precision and save you time and effort.
Additionally, you’ll need sharp fabric shears to cut your fabric accurately. Dull scissors can result in uneven edges and make the process more challenging.
Next, you’ll need a ruler or measuring tape to mark the placement of your pleats and tucks. This will ensure consistency and uniformity in your design. A fabric marker or chalk can be used to make temporary markings that can easily be removed later.
Pins are also essential tools for creating pleats and tucks. They’ll help hold your fabric in place as you sew and prevent it from shifting. Opt for thin, sharp pins to minimize damage to your fabric.
Lastly, you’ll need the appropriate fabric for your project. Lightweight fabrics like cotton and silk are ideal for pleats, while heavier fabrics like wool and denim are better suited for tucks. Choose a fabric that will hold the pleats or tucks well and create the desired effect.
How to Create Basic Pleats
To create basic pleats, begin by folding the fabric in a series of evenly spaced accordion-like folds. Start by laying the fabric flat on a clean and smooth surface. Take the edge of the fabric and fold it over to meet the opposite edge, creating a straight fold. Press down firmly to create a crisp fold. Repeat this step for the entire length of the fabric, making sure to keep the folds parallel to each other.
Next, fold the fabric back in the opposite direction, creating a pleat. The width of the pleat will depend on your desired look, but a common width is around 1 inch. Continue folding the fabric back and forth in this accordion-like manner, making sure to keep the pleats even and consistent.
To secure the pleats in place, you can use pins or baste stitches. Place pins or make temporary stitches at regular intervals along the pleats, ensuring that they don’t shift or come undone. This will help keep the pleats in place while you work with the fabric.
Creating basic pleats can add texture and detail to your sewing projects. With a little practice, you’ll be able to create beautiful pleats that enhance the overall design of your garments or home decor items.
Adding Variation With Box Pleats
Now let’s explore how you can add variation to your pleats by incorporating box pleats. Box pleats are a great way to create texture and detail in your garments. Unlike regular pleats, which fold in one direction, box pleats fold in opposite directions, creating a box-like shape. This adds visual interest and dimension to your fabric.
To create box pleats, start by marking the desired width of your pleat on your fabric. Then, fold the fabric in one direction, matching the marked points. Next, fold the fabric in the opposite direction, again matching the marked points. Pin the pleats in place and press them with an iron to create crisp, defined edges.
Box pleats can be used in various ways to add variation to your designs. You can incorporate them into skirts, dresses, or even sleeves. By playing with the width and placement of the pleats, you can achieve different effects. For example, wider box pleats can create a more dramatic and voluminous look, while narrower pleats can add subtle texture.
Experiment with different fabrics and pattern combinations to see what works best for your desired outcome. Remember to practice and refine your technique to achieve perfectly executed box pleats that enhance the overall aesthetic of your garment.
Creating Depth With Knife Pleats
You can achieve depth and dimension in your garments by incorporating knife pleats. Knife pleats are narrow, evenly spaced folds that can add visual interest and texture to your designs.
To create knife pleats, start by folding the fabric in one direction and pressing the fold firmly. Then, fold the fabric in the opposite direction, aligning the edges and creating a pleat. Press the second fold as well. Repeat this process until you have created all the desired pleats.
The width of the pleats can be adjusted to create different effects – narrower pleats will create a more intricate and delicate look, while wider pleats will add boldness and structure to your garment.
Consider incorporating knife pleats in areas where you want to create volume and movement, such as skirts or sleeves. The pleats will create folds that open up when you move, giving your garment a dynamic and three-dimensional appearance.
Experiment with different fabric types and colors to create unique and eye-catching designs.
Enhancing Detail With Inverted Pleats
Inverted pleats add intricate detail and texture to your garments, elevating their overall design. These pleats are created by folding the fabric inwards, towards the wrong side, resulting in a neat and polished appearance. Unlike other types of pleats, which are folded in the opposite direction, inverted pleats are characterized by their inward-facing folds.
One of the main advantages of using inverted pleats is the enhanced detail they provide. These pleats can add depth and dimension to your garments, making them visually interesting and unique. They can be strategically placed in various areas of your design to draw attention and create focal points. For example, you can incorporate inverted pleats along the neckline or down the center of a dress to create a striking visual effect.
In addition to adding detail, inverted pleats also contribute to the overall texture of your garments. The folds create interesting lines and shapes, adding a tactile element to your design. This texture can be further enhanced by the choice of fabric used. For instance, using a textured or patterned fabric can create a more pronounced and dynamic effect.
Exploring Different Tuck Techniques
To further enhance the texture and detail of your garments, let’s now explore different tuck techniques.
Tucks are a great way to add depth and visual interest to your designs. They can be used to create unique patterns and shapes, as well as to provide structure and form to your garments.
There are several different tuck techniques that you can experiment with, each offering its own unique effect.
One popular tuck technique is the simple tuck. This involves folding fabric and stitching it in place to create a raised line. Simple tucks can be placed in various positions on your garment, depending on the desired effect. They can be evenly spaced for a subtle texture or clustered together for a more dramatic look.
Another tuck technique to consider is the pintuck. Pintucks are narrow tucks that are usually placed close together. They can be used to create intricate patterns and designs on your fabric. Pintucks can be sewn in straight lines or curved, depending on the design you’re aiming for.
If you’re looking for a more intricate tuck technique, you might want to try the box pleat. Box pleats are formed by folding the fabric in opposite directions, creating a three-dimensional effect. These pleats can be used to add volume and movement to your garments.
Finishing Touches and Styling Tips
To complete your garment and elevate its overall look, let’s now explore some finishing touches and styling tips.
These final touches can make a big difference in how your pleats and tucks are showcased and can enhance the overall aesthetic of your piece.
Firstly, consider the type of fabric you’re using. Lighter fabrics, such as silk or chiffon, will create a more delicate and flowing effect, while heavier fabrics, like wool or denim, will give a more structured and defined look. Choose the fabric that best complements the style and design of your garment.
Next, think about the length and width of your pleats and tucks. Narrow pleats can create a subtle texture, while wider pleats can make a bold statement. Experiment with different sizes to find the one that suits your piece best.
Accessorizing is another important aspect to consider. Adding a belt or a sash can cinch in the waist and create a more flattering silhouette. Pairing your pleated or tucked garment with the right shoes and accessories can also elevate the overall look and make it more polished and put-together.
Lastly, consider the occasion or event you’ll be wearing your garment to. Dressing it up or down accordingly can make a huge difference. Pairing it with heels and statement jewelry can make it suitable for a formal event, while pairing it with flats and a casual bag can make it perfect for a more relaxed gathering.