
Did you know that 87% of people say that adding decorative throw pillows can instantly transform the look of a room? If you’ve ever wanted to spruce up your living space with some stylish and unique throw pillows, you’re in the right place.
In this guide, we will walk you through the step-by-step process of creating your own decorative throw pillows that will not only add a touch of elegance to your home but also reflect your personal style.
So, grab your sewing kit and get ready to unleash your creativity as we dive into the world of DIY throw pillows.
Choosing the Right Fabric
When making decorative throw pillows, it’s important to choose the right fabric for the desired style and durability. The fabric you select will greatly influence the overall look and feel of the pillows.
To achieve a sleek and modern style, opt for fabrics like linen or cotton blends. These materials have a smooth texture that adds a touch of sophistication to any room.
If you prefer a more playful and vibrant look, consider using fabrics with bold patterns or bright colors.
For durability, it’s crucial to choose a fabric that can withstand daily use and frequent cleaning. Fabrics like polyester or microfiber are known for their durability and resistance to stains and fading.
Additionally, consider the level of comfort you want the pillows to provide. Soft and cozy fabrics like velvet or chenille are perfect for creating a warm and inviting atmosphere.
Keep in mind that the fabric you choose shouldn’t only match your personal style but also complement the overall decor of the space.
Measuring and Cutting the Fabric
To measure and cut the fabric for your decorative throw pillows, start by determining the desired dimensions for each pillow. You want to ensure that your pillows fit perfectly in your space, so take the time to measure accurately. Measure the length and width of your pillow insert, and add 1 inch to each measurement to account for seam allowances. For example, if your insert measures 18 inches by 18 inches, you’ll need to cut a fabric square that’s 19 inches by 19 inches.
Once you have your measurements, lay your fabric on a clean, flat surface. Use a ruler or tape measure to mark the dimensions of your pillow on the fabric. Make sure your lines are straight and your corners are square. Double-check your measurements before cutting to avoid any mistakes.
When you’re ready to cut, use sharp fabric scissors to carefully follow the lines you have marked. Take your time and cut slowly to ensure clean, precise edges. Remember to cut two fabric squares for each pillow, one for the front and one for the back.
Now that you have measured and cut your fabric, you’re ready to move on to the next step in making your decorative throw pillows.
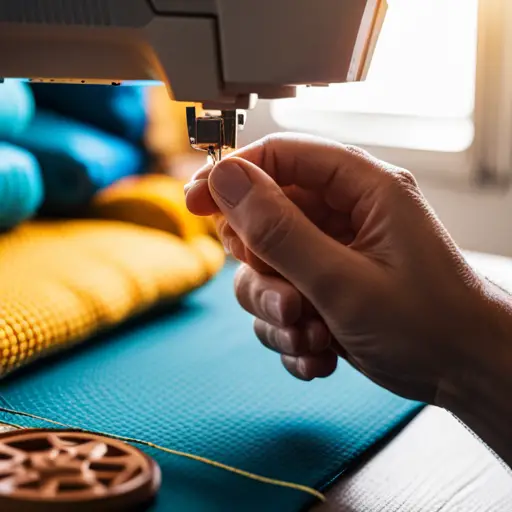
Sewing the Pillow Cover
Now that you have the fabric squares cut to the desired dimensions, it’s time to sew the pillow cover. Start by placing the two fabric squares together, with the right sides facing each other. Pin the edges together to secure the fabric in place.
Using a sewing machine, begin stitching around the edges of the fabric, leaving a small opening on one side. Make sure to backstitch at the beginning and end of the seam to reinforce the stitching.
Once you have sewn around all four sides, carefully trim the excess fabric from the corners. This will help create crisp, clean corners when you turn the cover right side out.
Now, turn the cover right side out through the opening. Gently push out the corners using a blunt object, such as a pencil or chopstick, to achieve sharp corners.
Next, insert the pillow form through the opening and adjust it until it fills the cover completely.
Finally, hand stitch the opening closed using a needle and thread. Make small, discreet stitches to secure the opening, and tie a knot at the end to secure the thread.
Congratulations! You have successfully sewn your decorative throw pillow cover. Now you can proudly display it and enjoy the cozy and stylish addition to your home decor.
Adding a Zipper or Closure
To give your decorative throw pillow cover a professional and polished finish, consider adding a zipper or closure. Not only will this make it easier to remove and clean the cover, but it will also give your pillow a neat and tidy appearance. Adding a zipper or closure may seem intimidating at first, but with a little practice, you can master this technique and achieve professional results.
Start by measuring the length of your pillow cover and purchase a zipper or closure that matches the size. Sewing a zipper or closure requires precision, so take your time and make sure you have the right tools on hand, such as a zipper foot for your sewing machine.
Next, mark the placement of the zipper or closure on your fabric. It’s important to place it at the center of one side of the pillow cover to ensure easy access. Pin the zipper or closure in place and use a basting stitch to temporarily secure it.
Once the zipper or closure is in place, sew it onto the fabric using a straight stitch. Make sure to backstitch at the beginning and end to reinforce the seam. Once you’re done, remove the basting stitches and press the fabric to give it a clean finish.
Adding a zipper or closure to your decorative throw pillow cover may require some practice, but it’s well worth the effort. Not only will it give your pillow a professional look, but it will also make it easier to maintain and clean. So go ahead and give it a try, and enjoy the polished finish of your handmade decorative throw pillows.
Stuffing the Pillow
Once you have successfully added a zipper or closure to your decorative throw pillow cover, the next step is to stuff the pillow. This is where you bring your pillow to life and give it the perfect amount of plumpness and comfort.
To start, gather your pillow stuffing material. You can use a variety of materials such as polyester fiberfill, foam chips, or even recycled fabric scraps. Make sure that the stuffing is clean and free from any debris.
Next, carefully open the closure or zipper of your pillow cover, creating a wide enough opening for you to insert the stuffing. Take handfuls of the stuffing material and gently push it into the corners and edges of the pillow cover, making sure to distribute it evenly. Avoid overstuffing, as it may cause the pillow to lose its shape or become too firm.
Once you have achieved the desired level of plumpness, close the zipper or closure securely. Give the pillow a gentle shake to ensure the stuffing is evenly distributed.
Now, your decorative throw pillow is ready to add a touch of comfort and style to your living space.
Sewing the Final Seam
To complete your decorative throw pillow, simply sew the final seam for a polished and professional finish. This step is crucial in ensuring that your pillow maintains its shape and durability over time.
Start by aligning the edges of the fabric panels together, making sure that the right sides are facing each other. Pin the edges together to secure them in place, ensuring that there are no puckers or wrinkles along the seam.
Using a sewing machine or a needle and thread, sew along the pinned edge with a straight stitch, around 1/2 inch from the edge. Remember to backstitch at the beginning and end of the seam to secure it.
Once you have sewn the entire length of the seam, trim any excess fabric and threads. This will give your pillow a clean and professional look.
Finally, turn the pillow right side out through the opening left in the previous step. Use a blunt object, like a pencil or a chopstick, to push out the corners and edges, ensuring a crisp finish.
Your decorative throw pillow is now complete and ready to enhance the aesthetic appeal of your living space.
Adding Decorative Embellishments
Now it’s time to take your decorative throw pillow to the next level by adding unique and eye-catching embellishments. Adding decorative embellishments is a great way to personalize your pillow and make it stand out. There are many different options for embellishments that you can choose from, depending on your personal style and the overall look you want to achieve.
One popular option is to use decorative trims or ribbons. You can sew these trims or ribbons along the edges of your pillow to create a beautiful border. You can also create interesting patterns or designs by overlapping different trims or ribbons.
Another option is to add embroidery to your pillow. You can use colorful threads to create intricate designs or add personalized initials or quotes. Embroidery adds a touch of elegance and can make your pillow truly one-of-a-kind.
If you’re feeling crafty, you can also consider adding fabric appliques or patches to your pillow. These can be cut into different shapes or designs and then sewn onto the fabric. Fabric appliques and patches can add a fun and whimsical element to your pillow.
Lastly, you can also consider adding buttons, beads, or sequins to your pillow. These embellishments can be sewn onto the fabric to create interesting patterns or designs. They can add a touch of glamour and sparkle to your pillow.
When adding embellishments, be sure to use a strong thread and secure them tightly to ensure they don’t come loose over time. Remember, the goal is to create a decorative throw pillow that’s unique and eye-catching, so don’t be afraid to get creative with your embellishments!
Cleaning and Maintaining Your Throw Pillows
Ensure that your decorative throw pillows stay fresh and beautiful by following proper cleaning and maintenance techniques.
Regular cleaning is essential to keep your pillows looking their best. Start by checking the care instructions provided by the manufacturer. Some pillows may be machine washable, while others may require spot cleaning or professional dry cleaning.
For machine washable pillows, use a gentle cycle with cold water and a mild detergent. Avoid using bleach or harsh chemicals, as they can damage the fabric or embellishments. To protect the pillows during the wash, place them in a pillowcase or laundry bag. It’s also a good idea to add a few towels to balance the load and prevent the pillows from becoming misshapen.
After washing, allow the pillows to air dry completely before placing them back on your furniture. You can speed up the drying process by placing them in a well-ventilated area or using a fan. Avoid using a dryer, as the heat can shrink or deform the pillows.
In between washes, it’s important to regularly fluff and rotate the pillows to maintain their shape and prevent flat spots. Gently patting or shaking the pillows can help redistribute the filling and keep them looking plump.